You’ve heard people talk about enterprise service buses and you think it’s time you learned out to use one. You read an awesome blog post about this new thing called Orbital Bus and you think it would be a good project to play around with. Where should you start? Let’s start here.
Understanding the Architecture
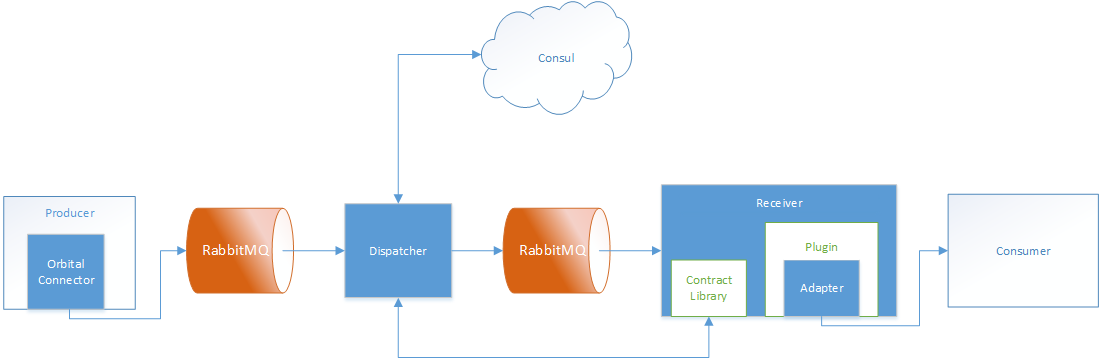
I’m sure you’ve checked out our project README, but just in case you need a refresher here’s a quick overview of how Orbital Bus works.
Everything starts with the Producer and the Consumer. The Producer produces calls into the system. These calls can be synchronous requests or asynchronous fire-and-forget messages. What’s important is that the Producer is what initiates the action. The Consumer consumes messages off the queue. Both the Producer and Consumer are external to Orbital Bus. They might be third-party services, COTS products, or custom code applications made by your developer(s). The Orbital Connector is a library the Producer uses to get messages into the system. We have a whole project dedicated to connectors. The Connector uses RabbitMQ to pass messages to the Dispatcher. The Dispatcher listens for incoming messages, finds services via Consul, and sends messages to the Receiver via it’s queue. Receiver’s do the heavy lifting. They load custom libraries, transform messages, and use adapters to send messages to the Consumer.
Here’s a diagram to give you an idea of the general flow of information:
Getting ready
For this little test, let’s put everything on your local machine. You’ll need to prepare by installing two third-party components: Consul and RabbitMQ. We use these for service discovery and message communication respectively. If you want some help you can check out our more detailed instructions. Since Orbital Bus is ready to communicate with any RESTful web service, we’re going to use JSONPlaceholder. Feel free to check it out and get a feel for the kind of messages you want to send.
Build a Producer
The Producer is the instigator of the pipeline. It calls out using the Orbital Connector and RabbitMQ to get the Dispatcher communicating with other nodes. Since our current Orbital Connector is written in .NET, you’ll want a .NET application that references it. We have a NuGet package to make it simple. We have four methods for sending with the connector: synchronously, asynchronously, synchronously that can be awaited, and a one-to-many route. We recommend starting with a synchronous call. All the producer needs is the service ID for the destination service (which you add to Consul below) and a JSON-serialized payload.
For more detailed instructions on making a Producer, check out our How-To Guide. It’s got a thorough process with code samples and everything!
Use Code Generation
Next we’ll setup the side of the Consumer. As we said above, we’re not going to bother building a web service (though you can if you really want to).
To get started you’re going to have to download the Code Generation project. We made this tool to help generate the necessary libraries for the Orbital Bus Receiver to connect with a service. All the files you work on for Code Generation are Javascript, so your C#, Java, Python, and Ruby developers should all be able to use it. Of course we have a handy guide to making a library. When you’re done building your library keep track of the `bin` folder in the project directory. We’re going to need all its contents.
Configure your Nodes
I know what you’re thinking: “Where’s the actual Orbital Bus?” That’s the beauty of our distributed system. The bus has no central hub to stand up. Each service has a node or nodes that live alongside it to facilitate communication.
To get our local instance up we’ll need both a Dispatcher and a Receiver node. You can download them on our release page. With the release package unzipped in a location of your choosing, you’ll want to copy over your code generation output. Remember that bin folder we told you to keep track of? Copy all its contents into the Plugins folder for the Receiver. The Receiver will pull in those libraries at runtime and then it’s ready to communicate to your web service.
You’ll also want to set the values of the configuration files to the appropriate values for your local deployment. We have a handy article about all the configuration properties. Be sure to open up any ports you’re planning on using for your Dispatcher and Receiver!
Run!
Now it’s time to set everything in motion! If your Consul and/or RabbitMQ aren’t already running start them up. Start up your Receiver and register it with Consul. (We also have a Consul Manager tool in the release package. Check out this article to see how you can use it to register your service.) Start up your Dispatcher and your Producer and start sending messages!
If you’ve run into any snags or want a more thorough description, check out our How-To Guide. It describes each step in detail so you can see how every part of the process should be configured.
What’s next? Try implementing a second call. Check out our other documentation, like our Handshake Diagram to better understand the paths of the messages. Maybe add another Receiver with another web service to give you an idea of multiple nodes on the network. Hopefully this test will be a small step along your long future with ESBs. Enjoy!